Modern Desktop Linux on a Sony PS3 in 2024
By Paul Sajna August 18 2024Alternate title: 2024 - The year of the linux desktop on a PS3
This guide will show you how to install the latest Debian (trixie/sid) distro with a very modern Linux kernel (6.4 currently). The instructions should be pretty much the same going forward beyond these versions in the future.
Why would you want to do that, you may be asking? I don't have a great answer but maybe you want to bring new life to your old console or maybe you just think it's cool/funny/interesting like I do. If you found your way here you probably don't need my weak attempts at justification anyways. I consider many of my projects to be what I've taken to calling Dada programming (as in Dadaism), but that's a blog post for another time.
So let's get on with it then.
Installing CFW
The first thing you'll need to do is install up to date CFW (custom firmware) on your PS3. I used Evilnat CFW but anything with OtherOS/PetitBoot support should work. There's a video that shows you how to do that here
One thing I ran into while trying to follow that video was that my PS3 didn't have recent enough SSL certificates to browse to the https://www.ps3toolset.com URL. (error code 0x80710a06) If that's the case you may have to update to OFW (official firmware) 4.91 before installing custom firmware, or you can use a reverse proxy. I used a modified version of the script from this stackoverflow page, but I no longer have the exact script I used and the more think about it I'm not really sure how it works well enough to make a firm recommendation. Proxying http to http to a page that redirects to https??? Sorry, I did something that worked on 4.75 but I really don't know how it worked or what it was anymore.
Installing Petitboot Bootloader
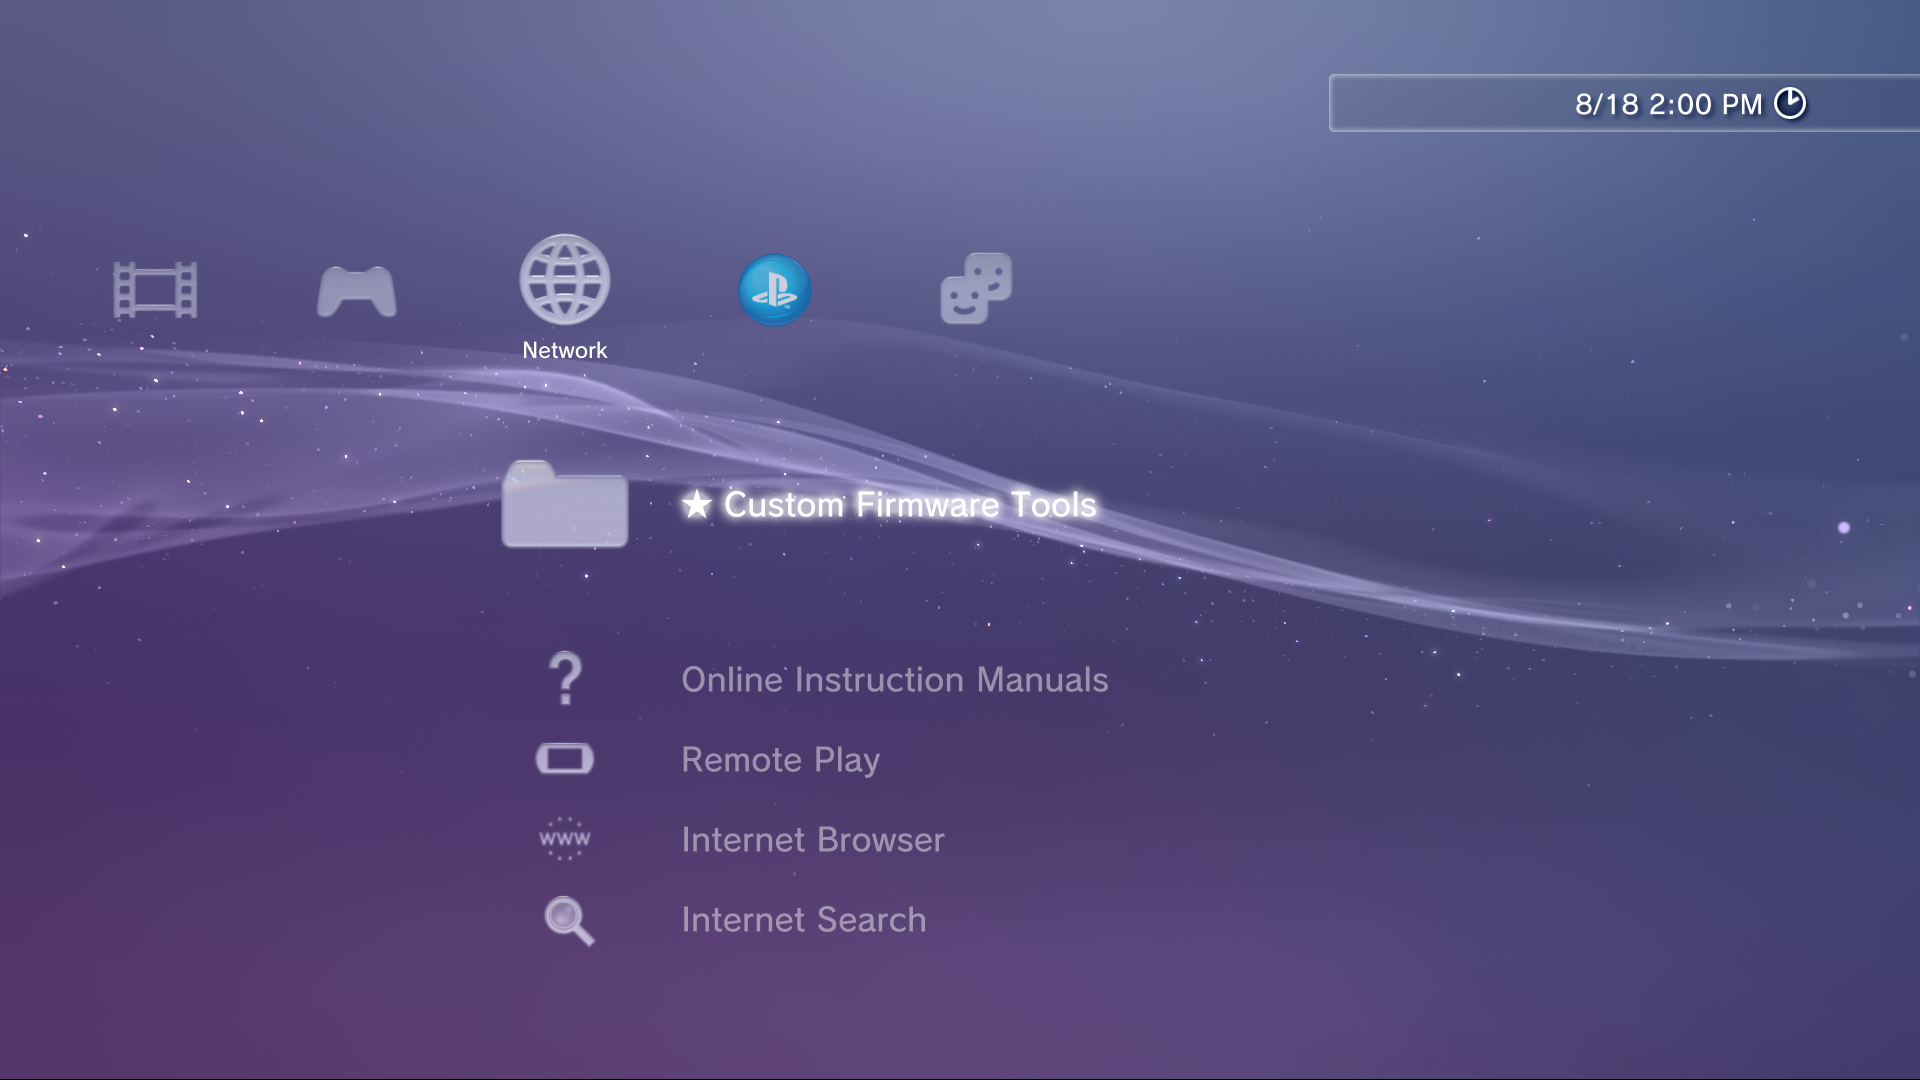
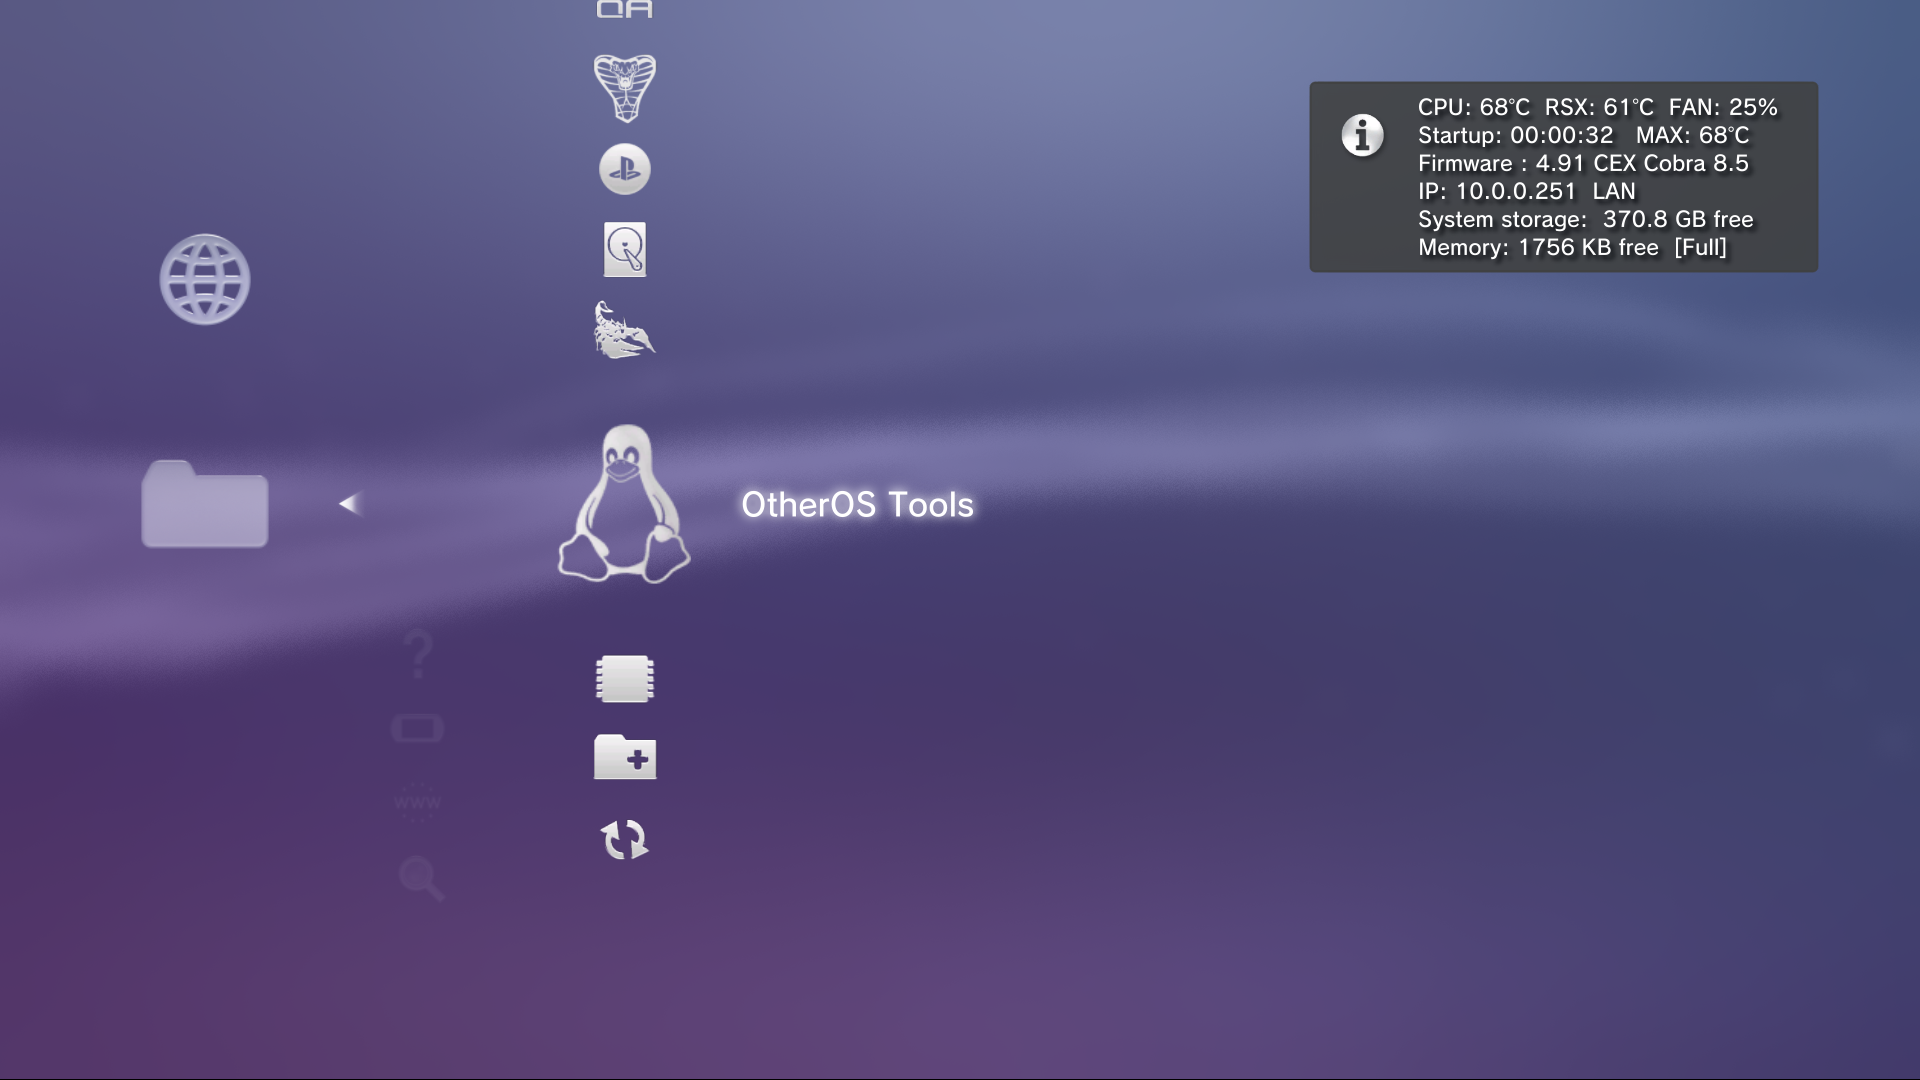
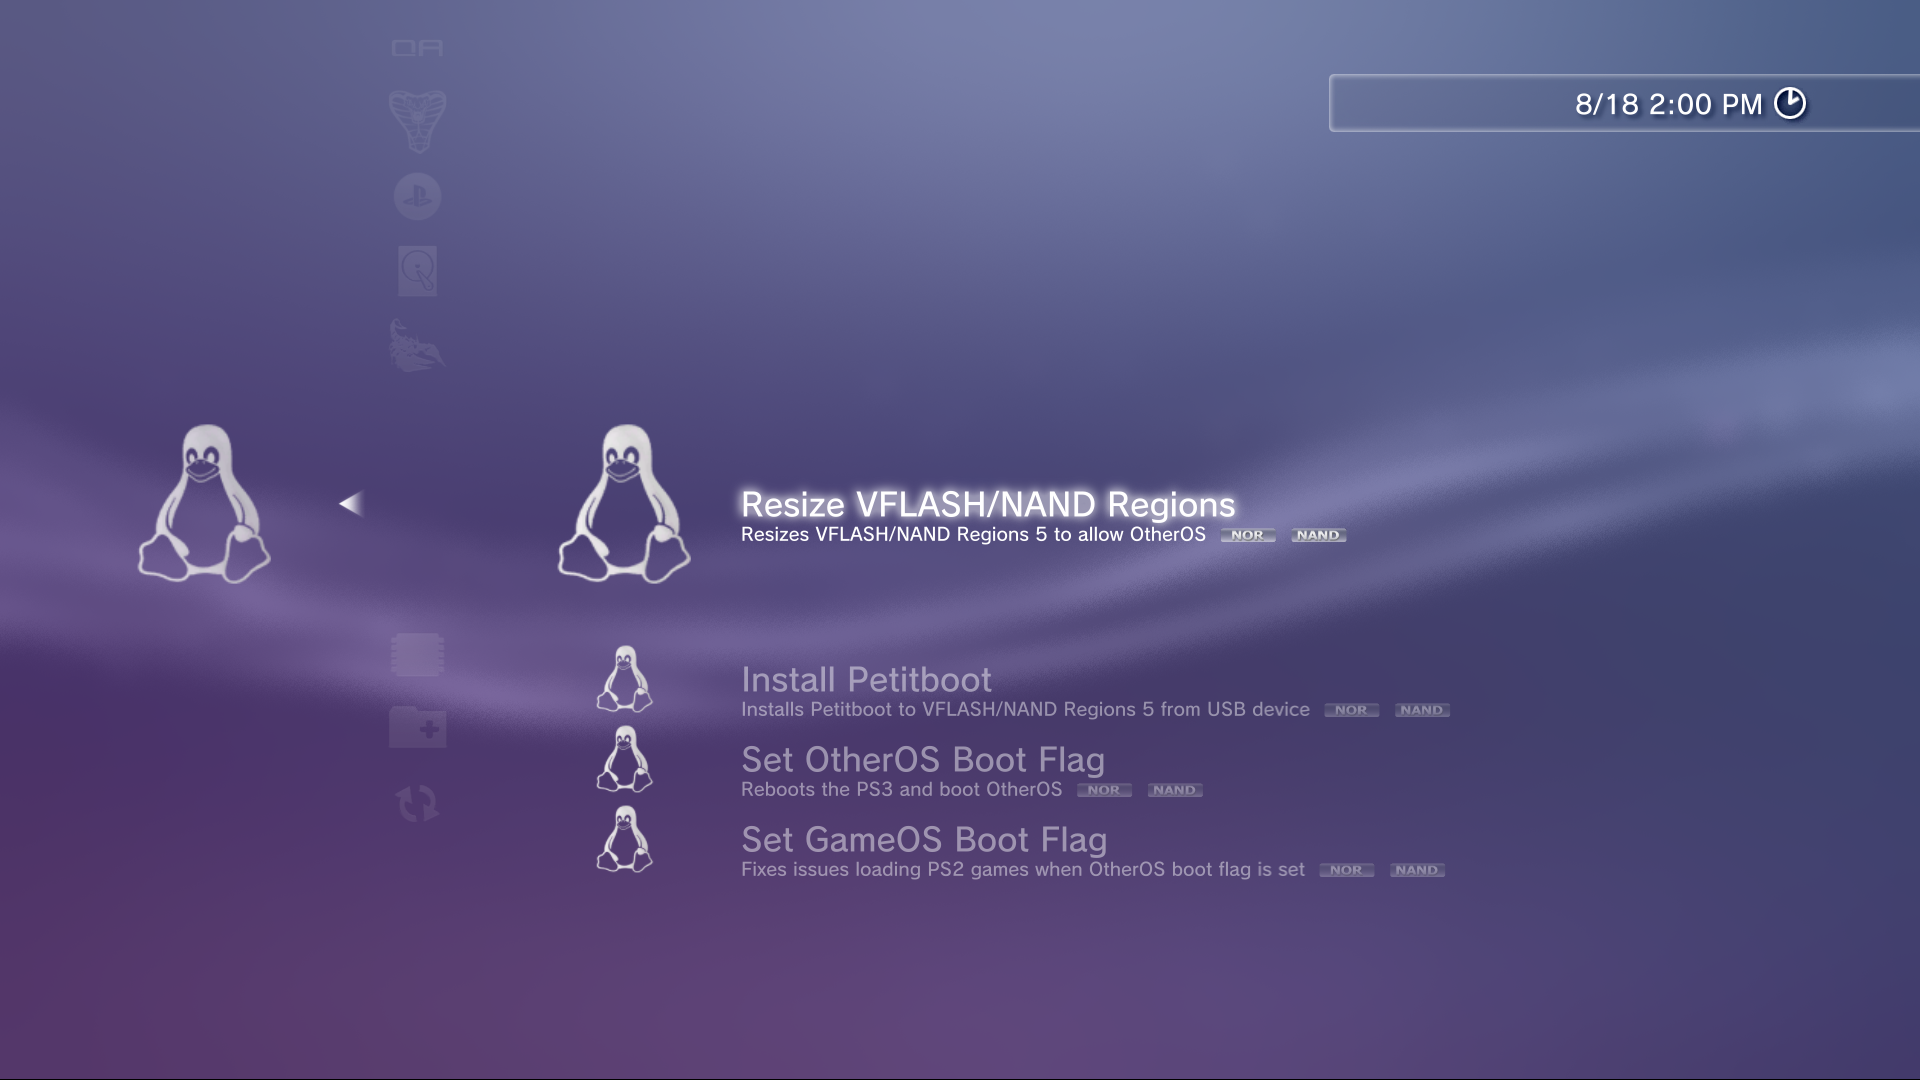
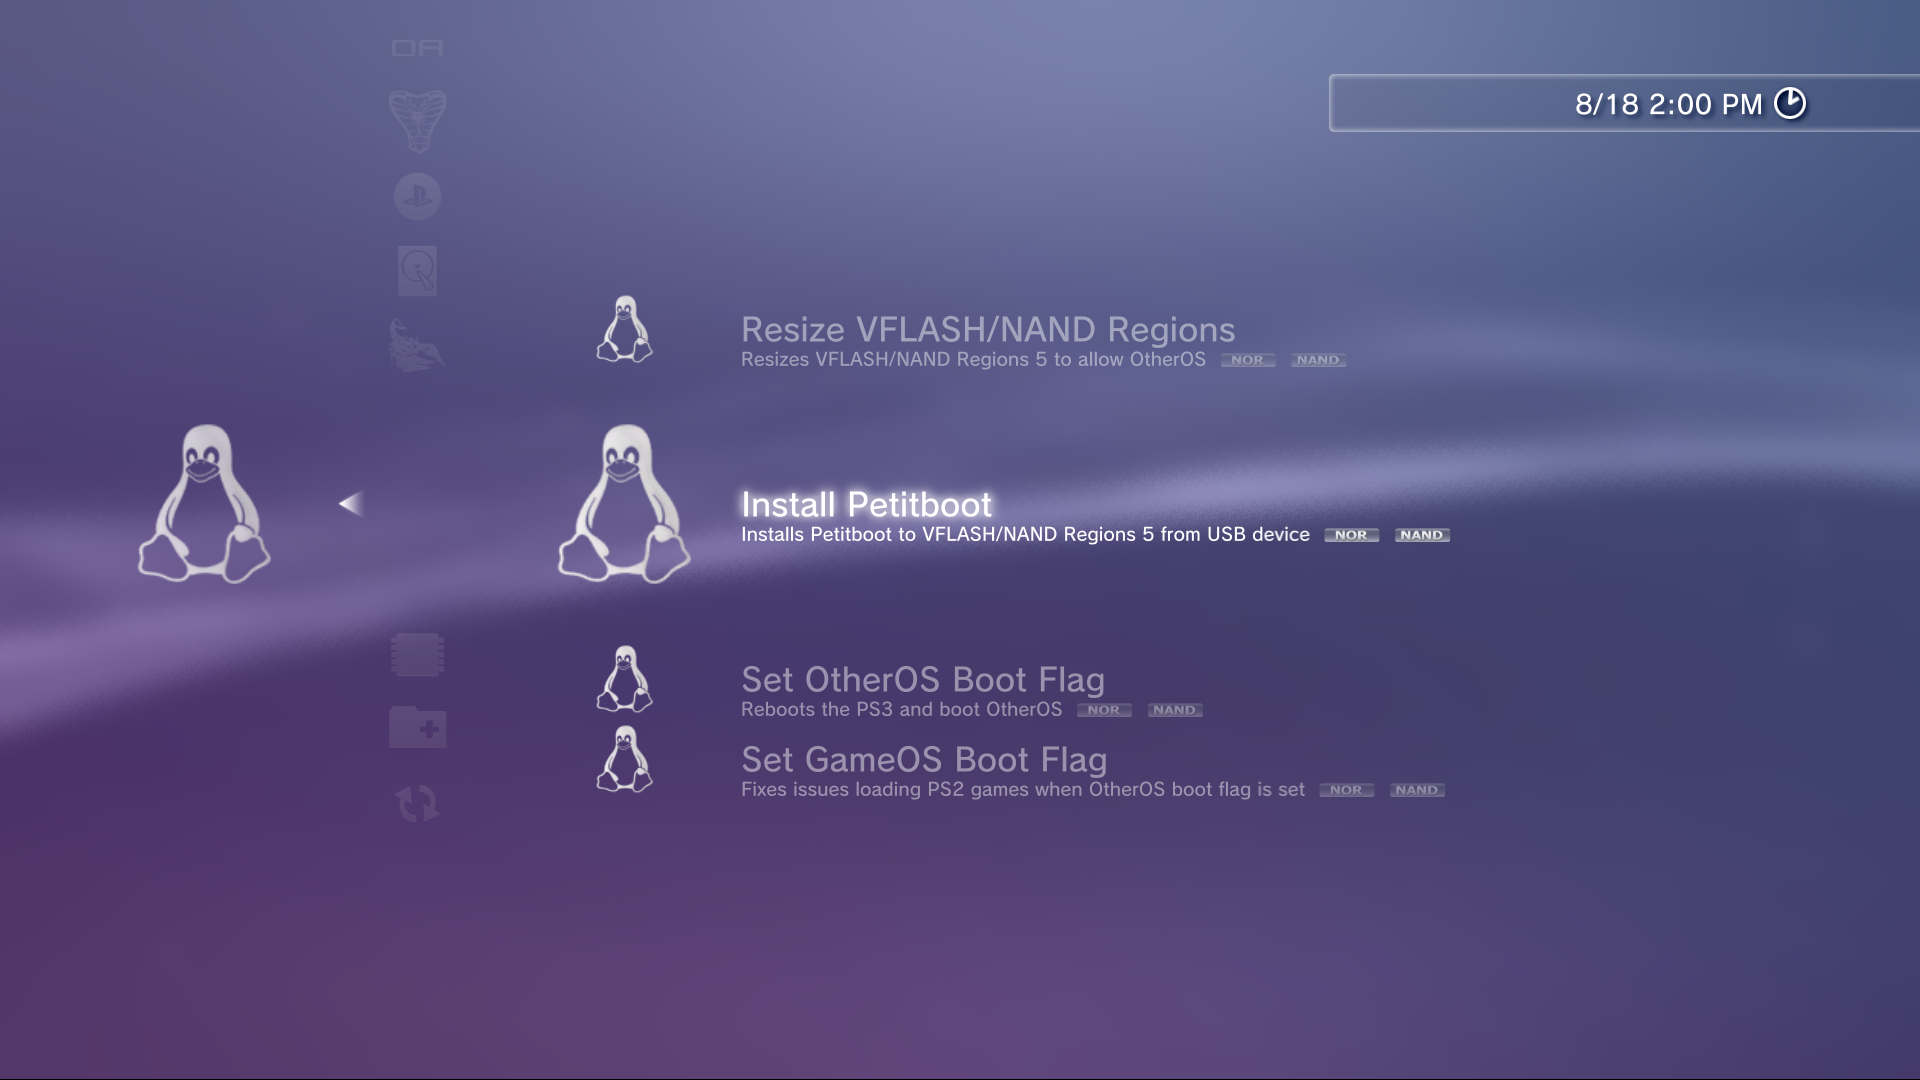
Once you have the custom firmware running, the next step is to set up the bootloader for OtherOS, which is called Petitboot. You can download it here. Whether you download the NAND or NOR file depends on the model of PS3 you have. You can look up the model number here. Put the dtbimage file for your model on a USB flash drive and plug it into your PS3, then select these options in the XMB in this order.
Downloading tools
I'm assuming you have a traditional Linux Desktop PC to set this up on. You'll also need an external USB HDD/SSD/or I guess a 32GB+ flash drive might work too.
So on your linux workstation, you're going to need the following tools to follow along with the rest of this guide. How you'll obtain and configure them is distro-specific, but should be easy enough to search if you have a moderate level of linux experience.
- git
- powerpc64-linux-gnu-gcc ( not powerpc64le-linux-gnu-gcc! )
- qemu binfmt (also sometimes called binfmt-misc)
- gparted
- debootstrap
Formatting the disk
Whether the disk is MBR or GPT partition table doesn't seem to matter. I've heard GPT is recommended but I used MBR without noticing it and it works fine. Set up the disk with a large ext4 root partition and a 2GB (or more if you want) swap partition. The PS3 has 256MB of main system RAM and another 256MB of VRAM that can be used with some manual setup, and you'll probably be swapping lots as a result.
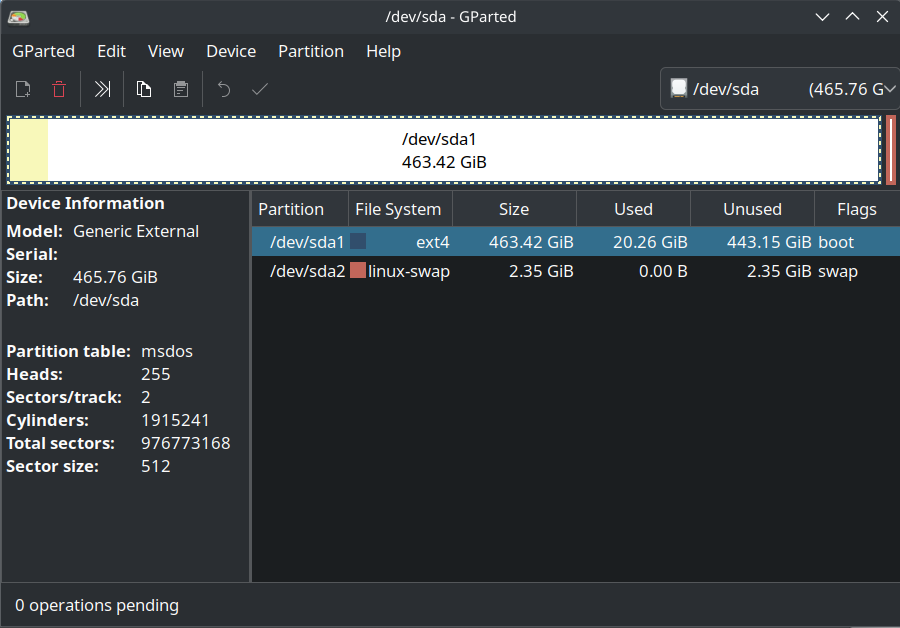
Once I formatted the disk as ext4 and tried to boot off it, I got some weird errors from petitboot (or maybe it was the kernel, I don't remember for sure). I had to disable journalling and checksumming in the filesystem to get it to boot
sudo tune2fs -O ^metadata_csum /dev/sdb1 # MAKE SURE YOU REPLACE THIS WITH THE CORRECT BLOCK DEVICE
sudo tune2fs -O ^has_journal /dev/sdb1 # MAKE SURE YOU REPLACE THIS WITH THE CORRECT BLOCK DEVICE
Cross-Compiling the Kernel
You might need to download a bunch of other nonsense like yacc and bison for this step, search up the packages you need to compile a kernel before continuing.
The kernel sources for ps3 linux are available here. I used the master branch which is currently version 6.4.0 but you're welcome to explore some of the other branches/tags if you're feeling adventurous. Clone this repo using git.
My kernel config is here. It's similar to this one which itself is derived from the upstream ps3_defconfig. My config adds some drivers specific to the usb keyboard I was using because I had issues with that initially. I think the actual problem I encountered may have been kernel modules not being properly installed, so one of the other configs would probably work just as well. Place the config in the ps3-linux folder you cloned from git and call it .config (this will make it a hidden file!). As new kernel options are added you may also need to run
make ARCH=powerpc CROSS_COMPILE="powerpc64-linux-gnu-" olddefconfig
to update the config and you can also use menuconfig in place of
olddefconfig to bring up the kernel configuration menu if you have any additional customizations to make.
Once the kernel is configured, run
make ARCH=powerpc CROSS_COMPILE="powerpc64-linux-gnu-" -j$(nproc)
to compile the kernel
Next you'll want to mount the ext4 partition you created on your external disk with gparted so we can install the kernel to it.
sudo mkdir /mnt/ps3linux
sudo mount -t ext4 /dev/sdb1 /mnt/ps3linux # replace sdb1 with your actual block device
sudo mkdir /mnt/ps3linux/boot
Then to actually install the kernel, run
sudo make ARCH=powerpc CROSS_COMPILE="powerpc64-linux-gnu-" INSTALL_PATH="/mnt/ps3linux/boot" install
sudo make ARCH=powerpc CROSS_COMPILE="powerpc64-linux-gnu-" INSTALL_MOD_PATH="/mnt/ps3linux/" modules_install
Creating the rootfs
Ok we have the kernel, next up is the userspace! You could probably use any distro that supports PPC64 (big endian) here but to keep things focused and straightforward I'll show you how to set up Debian.
Debian has a tool called debootstrap that it uses to create the rootfs.
You might also be able to use mmdebstrap to install the rootfs and the standard desktop packages together, but I didn't try that, so I'll show you what I tried.
sudo apt install debian-ports-archive-keyring
sudo debootstrap --arch=ppc64 --variant=buildd --keyring=/usr/share/keyrings/debian-ports-archive-keyring.gpg sid /mnt/ps3linux https://deb.debian.org/debian-ports
sudo mount -t proc proc /mnt/ps3linux/proc
sudo chroot /mnt/ps3linux
sudo apt install debian-ports-archive-keyring
This creates a very simple small debian install on our external drive, and changes-root (chroots) into it using qemu-binfmt so we can continue adding things we need.
Configuring the rootfs
At this point, you've got a debian install you can add whatever you need to. I'll make some recommendations but this part is very individualized and personal to what you like on your linux systems.
I typically install a text editor (vim), some build tools (build-essential), curl, wget, git, ssh, etc.
You're also going to want to configure your users and passwords in this step so you can login when the system boots up on the ps3.
I installed and ran the tasksel command which is part of the debian installer and gives you a guided menu to install
the default desktop environment and many other default packages.
Lastly, when I was troubleshooting the boot process later on, I noticed I needed to install the login package, because
systemd-logind was somehow broken and I was unable to login to my user accounts.
We'll also need to set up the initial ram filesystem (initramfs) which the kernel uses during the boot process
mkinitramfs -k -o /boot/initrd.img 6.4.0+ # replace '6.4.0+' with the kernel version you compiled
Once you're done, run exit to leave the chroot.
Configuring the bootloader
Place this bootloader config in /mnt/ps3linux/etc/yaboot.conf
Note this assumes a 1080p screen video mode.
init-message = "Debian on PS3"
timeout=5
default=Debian

image=/boot/vmlinux
        label=Debian
        initrd=/boot/initrd.img
        root=UUID=f9937a76-f7e6-4c7a-a4bd-04820c13d420
        append="video=ps3fb:mode:133 nomodeset rw"

image=/boot/vmlinux
        label=Debian failsafe
        initrd=/boot/initrd.img
        root=UUID=f9937a76-f7e6-4c7a-a4bd-04820c13d420
        append="video=ps3fb:mode:133 nomodeset rw memtest noapic noapm nodma nomce net.ifnames=0 nolapic vga=normal"

image=/boot/vmlinux.old
        label=Debian old
        initrd=/boot/initrd.img.old
        root=UUID=f9937a76-f7e6-4c7a-a4bd-04820c13d420
        append="video=ps3fb:mode:133 nomodeset rw nosplash"

image=/boot/vmlinux.old
        label=Debian old failsafe
        initrd=/boot/initrd.img.old
        root=UUID=f9937a76-f7e6-4c7a-a4bd-04820c13d420
        append="video=ps3fb:mode:133 nomodeset rw nosplash memtest noapic noapm nodma nomce nolapic vga=normal"
Other video modes may be used by replacing 133 with one of these
AUTO Detect Mode:
      0: auto (480i/576i if not HDMI)

60 Hz Broadcast Modes:
      1: 480i    (576 x 384)
      2: 480p    (576 x 384)
      3: 720p   (1124 x 644)
      4: 1080i  (1688 x 964)
      5: 1080p  (1688 x 964)

50 Hz Broadcast Modes:
      6: 576i    (576 x 460)
      7: 576p    (576 x 460)
      8: 720p   (1124 x 644)
      9: 1080i  (1688 x 964)
      10: 1080p  (1688 x 964)
VESA Modes:
      11: wxga   (1280 x 768)
      12: sxga   (1280 x 1024)
      13: wuxga  (1920 x 1200)

60 Hz Full Screen Broadcast Modes:
      129: 480if   (720 x 480)
      130: 480pf   (720 x 480)
      131: 720pf  (1280 x 720)
      132: 1080if (1920 x 1080)
      133: 1080pf (1920 x 1080)

50 Hz Full Screen Broadcast Modes:
      134: 576if   (720 x 576)
      135: 576pf   (720 x 576)
      136: 720pf  (1280 x 720)
      137: 1080if (1920 x 1080)
      138: 1080pf (1920 x 1080)
Boot 🐧🐧 🎉
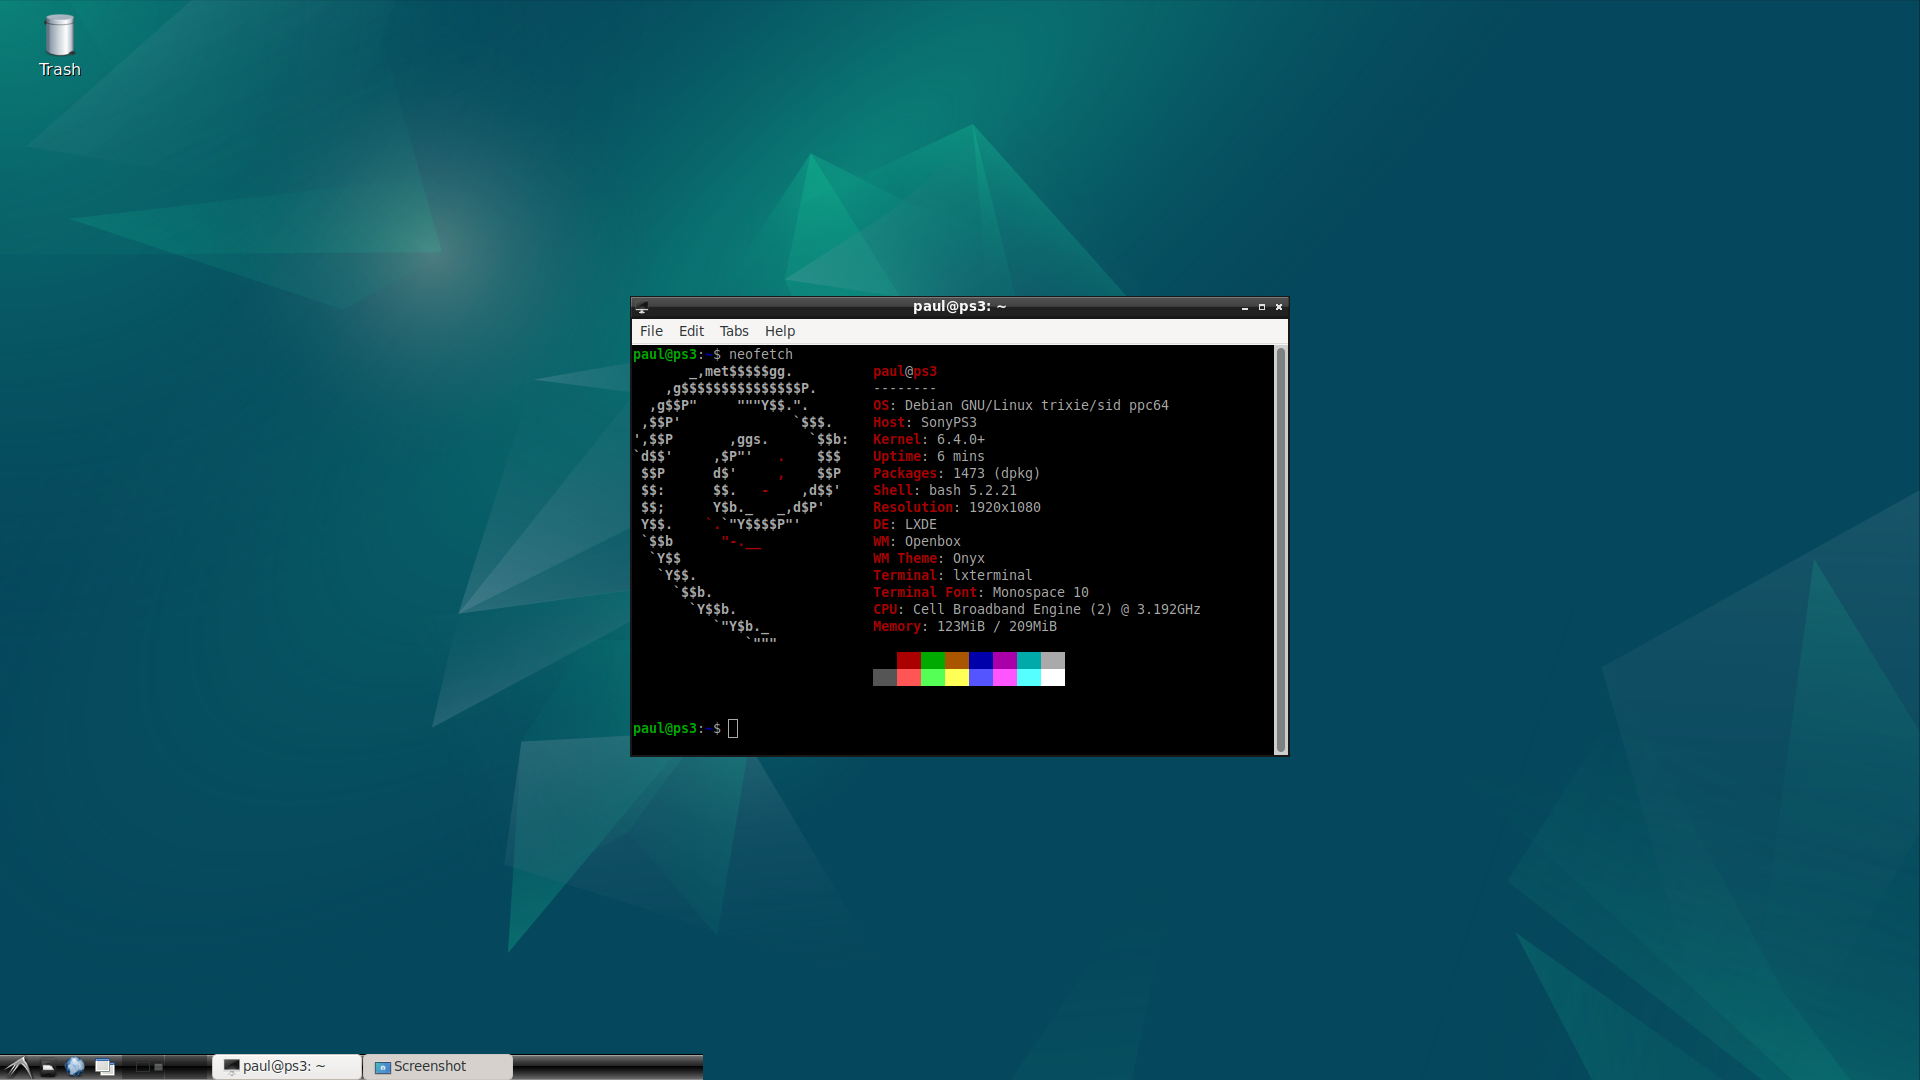
With all that set up, you should be ready to unplug the external drive from your linux workstation, plug it and a usb keyboard into your PS3, and select the "Set OtherOS boot flag" option in the menu we previously used to install petitboot. Petitboot will present the bootloader options we've just configured, you can select one of them to boot. Hopefully you see the happy Tux penguins during boot and land at a login prompt. Happy Linuxing!
Miscellaneous Notes
You can use PS3 vram as swap by following this guide
You may also need to set up /etc/fstab to take advantage of the swap partition you configured earlier.
References/Kudos
https://sourceforge.net/p/redribbon/wiki/Home/